Starting the process of picking a new or replacement PTAC (Packaged Terminal Air Conditioner) unit involves a few important steps. You need to make sure you choose the right unit for your room’s needs. This includes figuring out the right size, the BTU (British Thermal Unit) needs, and the electrical requirements. This guide helps you through these steps in a simple way, so you can make a good choice for your heating and cooling needs.
PTAC Unit Measurement and Sizing
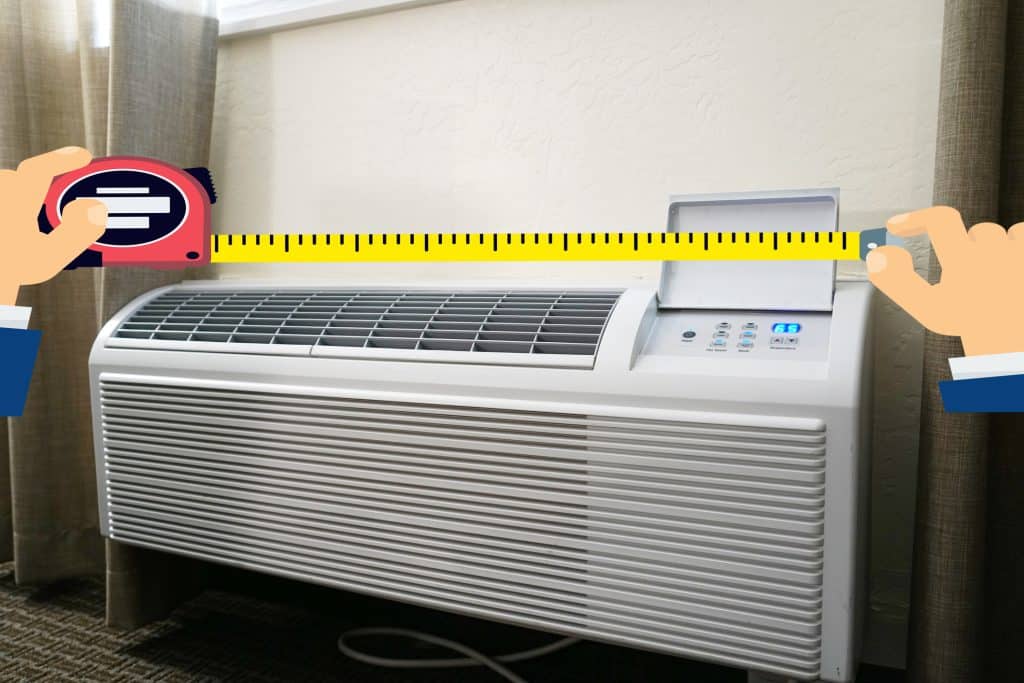
The initial step in selecting a new PTAC unit is to accurately measure the space it will occupy. A standard PTAC unit is designed to fit wall sleeves with dimensions of 42 inches in width and 16 inches in height, although depth can vary. It’s imperative to measure the exterior dimensions of the wall sleeve to confirm that the replacement unit will fit. For areas that may require a smaller unit, often labeled as mini PTACs, the dimensions are typically 26 inches by 15 ⅝ inches. Correct sizing ensures the unit will physically fit and operate efficiently.
Determining PTAC Unit BTUs
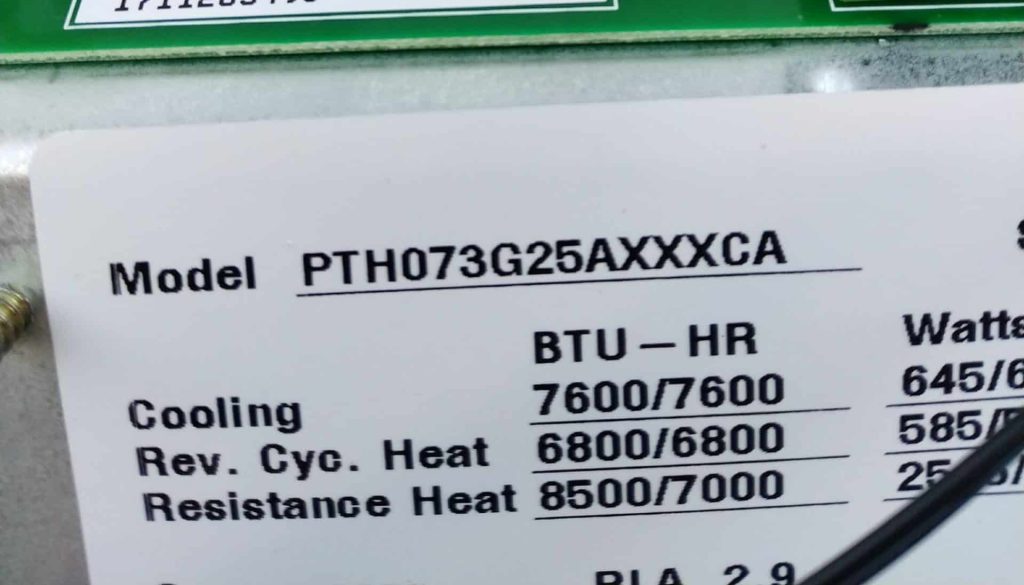
The effectiveness of a PTAC unit in heating or cooling a space is measured in British Thermal Units (BTUs). To determine the appropriate BTUs for your PTAC unit, factors such as the size of the room, insulation quality, and external environmental influences need to be considered. An existing unit can often provide a reference point for BTU requirements. For spaces without a previous unit or for additional accuracy, use the chart below to determine the necessary capacity.
| Square Feet (sq. ft.) | PTAC Unit BTU Needed |
| 250-300 sq. ft. | 7,000 BTU |
| 300-400 sq. ft. | 9,000 BTU |
| 400-550 sq. ft. | 12,000 BTU |
| 550-700 sq. ft. | 15,000 BTU |
| 700-1,000 sq. ft. | 17,000 BTU |
PTAC units are categorized into four primary BTU ranges. Across manufacturers, you’ll typically find units within the approximate capacities of:
- 7,000 BTU Range PTAC Units
- 9,000 BTU Range PTAC Units
- 12,000 BTU Range PTAC Units
- 15,000 BTU Range PTAC Units
Electric Heat vs. Heat Pump PTAC Unit Models
When it comes to the heating component of PTAC units, you have the option between electric heat models and those equipped with a heat pump. Electric heating units offer reliable warmth and are suited for areas with mild to moderate winters. Heat pumps, noted for their energy efficiency, are effective in temperatures above approximately 35° F and automatically switch to electric heating in colder conditions. This choice significantly influences the unit’s operational cost and efficiency, making it a crucial consideration based on your geographical location and energy savings goals.
PTAC Unit Electrical Requirements
Voltage
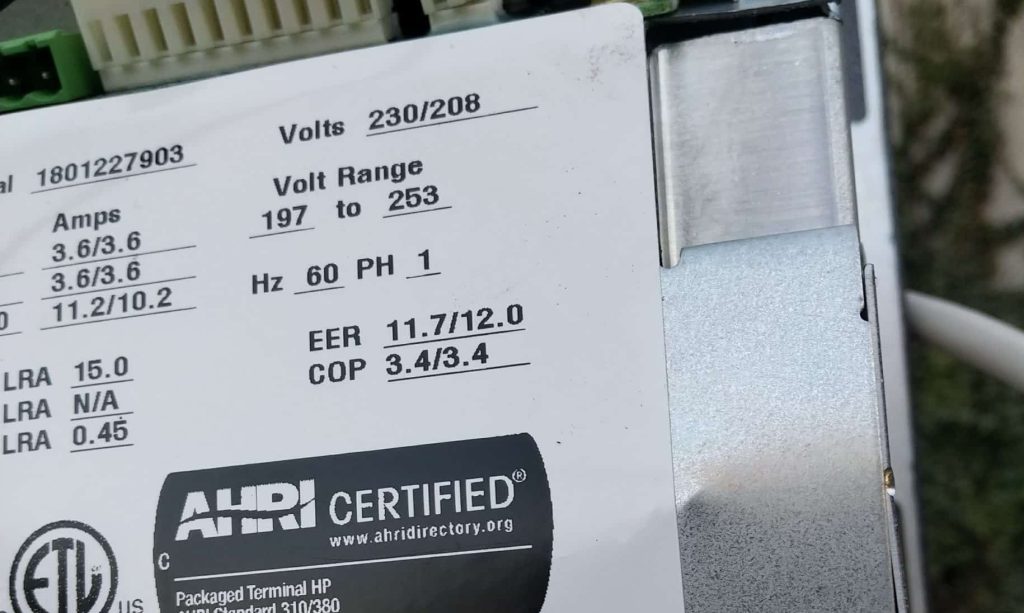
When selecting a PTAC unit, it’s crucial to match the unit’s voltage to your building’s electrical system. PTACs generally come in two voltage varieties: 208/230 volts, often seen in homes and residential applications, and 265/277 volts for commercial applications. Check your building’s voltage beforehand to prevent operational issues or hazards. This can be found on the existing unit’s spec plate or its manual.
Power Cords & Amperage
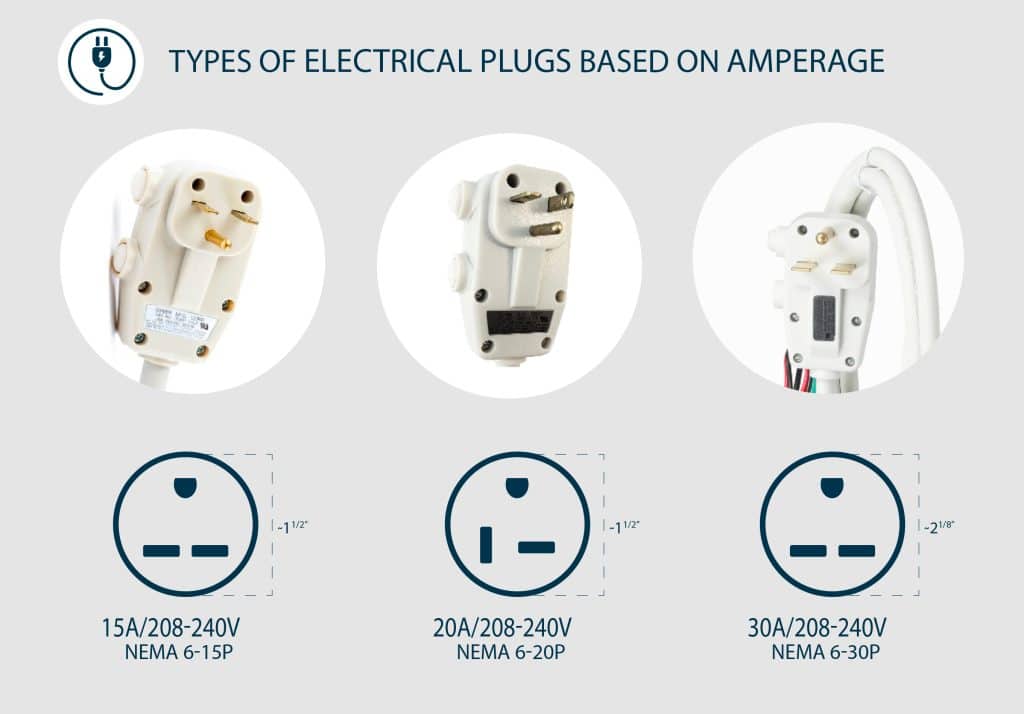
After confirming the voltage, determine the correct amperage for your PTAC unit, typically 15, 20, or 30 amps. Match the amperage to what your electrical system can support, influencing the power cord type and unit efficiency. Check the breaker panel or the existing unit’s spec plate to find this information. The right amperage choice is vital for safe and efficient PTAC operation.
*Various Friedrich models and all models from GE and LG provide selectable power cord configurations, allowing you to pick and easily connect the suitable power cord to your unit at the time of purchase. On the other hand, Amana and Hotpoint units come with an integrated power cord, necessitating the selection of the correct unit and power cord pairing when ordering. These units are available in configurations designed for 15, 20, or 30 amp electrical systems.
Installing Your Replacement PTAC Unit: A Comprehensive Guide
Achieving comfort in your space with a PTAC unit is straightforward. If your existing wall sleeve and rear grille are intact and in good shape, there’s no need for replacement parts. Just follow this detailed installation guide:
Step 1: Preparing the Unit
Initiate the installation by detaching the front panel of the PTAC unit. This is usually done by grasping the panel from the bottom, gently lifting, and then disengaging it from the main body.
Step 2: Unfastening the Chassis
Examine the chassis sides to find the securing screws, typically 2 to 3 on each side. Carefully unscrew these to prepare for the removal of the unit from its sleeve.
Step 3: Removing the Old Unit
Grip the chassis firmly on both sides. You may need an additional person for this step as PTAC units can weigh approximately 120 pounds. Once secured, smoothly slide the chassis out of its sleeve.
Step 4: Sleeve and Grille Inspection
Now, assess the condition of the wall sleeve. Look out for signs of deterioration like rust or damage. If the sleeve is compromised, consider its replacement. Also, verify that the rear grille is still firmly attached and in proper condition.
Step 5: Installing the Replacement Unit
Elevate the replacement PTAC unit to align with the wall sleeve and gently insert it into the sleeve, ensuring it fits flush with the front of the sleeve. Fasten the unit in place using the provided screws. If your unit did not come with screws, #10 x 1 1/2″ screws with hex or Phillips heads should suffice.
Step 6: Finalizing the Setup
Once the unit is secured, plug it into an appropriate electrical outlet. You’re now set to enjoy the comfort of your newly installed PTAC unit.
Please consult the specific installation manual for your model for any additional instructions or for guidance on installing supplementary accessories.